You are using an out of date browser. It may not display this or other websites correctly.
You should upgrade or use an alternative browser.
You should upgrade or use an alternative browser.
Doc Wong’s ‘94 L400 Mods
- Thread starter DocWong
- Start date
DocWong
Active Member
New Audio System Install in Delica L400
Here’s the link to my original post:New Audio System Install in Delica L400
Hi, With advice from a buddy that was a professional car audio installer, I wanted to share the install I did recently with what I think are amazing results so far. It was a LOT of work, but fun and worth it. 1. New head unit Kenwood Excelon DMX706S. 2. Front Speakers: 6 1/2" Polk Audio MM...
But since then I’ve added a 5 channel amp, subwoofer and bass shakers!!
With advice from a buddy that was a professional car audio installer, I wanted to share the install I did recently with what I think are amazing results so far. It was a LOT of work, but fun and worth it.
1. New head unit Kenwood Excelon DMX706S.
2. Front Speakers: 6 1/2" Polk Audio MM 6502 (separate tweeter and mid woofers)
3. Rear Speakers: 6" x 9" Polk Audio MM 692 3 way speakers
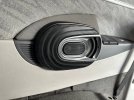
4. Full sound damping of all panels including doors. This makes a HUGE difference. Also this has the added benefits of reducing outside noise and sound. Also heat insulation from the elements. Outside sound was SO deadened that when I happen to open my door with the engine still on, I honestly thought there was some kind of engine damage from all the noise I heard when I opened my door. It was just the contrast between the quieter interior and the regular engine noise.
5. Alternator upgrade to 125 amps
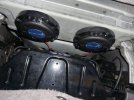
6. 5 Channel Amp
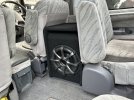
7. 12” Subwoofer.
8. Bass Shakers under the front seats
What took the longest was the damping of all panels:
1. Removal of panels. With the help of panel trim removers from Amazon, it made it doable. You have to find where the attachment points are and use the various tools to pry them loose without damaging the interior panels.
2. Then I applied CLF or Killmat to the inner wall of the outer skin (the outermost wall of the vehicle). This is basically sound deadening material that deadens the hollow sound you get off the steel skin.
Then on top of that I applied 1" sound absorbing foam.
Then applying Killmat onto the inner skin of the door:
Then applying 1/8" sticky back Ensolite on top of the Killmat:
Attachments
WanderingRobot
New Member
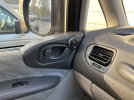
Where did you get the overlays from for your guages?Here's my dash face plate mod. Now with adjustable brightness I can see the dash clearly on a bright sunny day. And it has an MPH scale along with the KM scale for speed.
View attachment 20076View attachment 20077View attachment 20078View attachment 20079
WanderingRobot
New Member
I was able to find it with that, thanks!The only place I found was on AliExpress. Search L400 Dash. Here’s what you’ll find: SD Motor EL Glow Gauge Plasma Dial Automatic Transmission for Mitsubish L400 Delica Space Gear Starwagon 1994 2007
$45
Aplus
New Member
Dear DocWong thanks for these great mods.
I just imported a 2005 Delica L400 Exceed into Australia directly from Japan and registered it 6 weeks ago.
The first modification I wanted to do was to the tyres and wheels and thought about a 2" lift. Then I found your post.
My Delica came standard with 15 inch alloy rims with 225/80R15 YOKOHAMA GEOLANDER A/T tyres.
I want to install ROTA 5-Star wheels 16" x 8" with bolt pattern 6x139.5 (5.5”) and Cooper Rugged Trek DISCOVERER Tyres 265/70R16 and 0 offset.

I see you did the same so I am very interested to know how it went. You say:
-worked extremely well off road on Blue graded off road trails.
-improved mileage with the larger diameter wheels
-looks really cool
-did not need to lift it
- corners amazingly well-this is a BIG plus for me as I live up in the mountains where twisty roads are the norm.
It seems too good to be true.

Really enjoying the Delica and looking forward to creating a purpose built van.
Welcome any advice or guidance.
Derek
Sydney, Australia
I just imported a 2005 Delica L400 Exceed into Australia directly from Japan and registered it 6 weeks ago.
The first modification I wanted to do was to the tyres and wheels and thought about a 2" lift. Then I found your post.
My Delica came standard with 15 inch alloy rims with 225/80R15 YOKOHAMA GEOLANDER A/T tyres.
I want to install ROTA 5-Star wheels 16" x 8" with bolt pattern 6x139.5 (5.5”) and Cooper Rugged Trek DISCOVERER Tyres 265/70R16 and 0 offset.
I see you did the same so I am very interested to know how it went. You say:
-worked extremely well off road on Blue graded off road trails.
-improved mileage with the larger diameter wheels
-looks really cool
-did not need to lift it
- corners amazingly well-this is a BIG plus for me as I live up in the mountains where twisty roads are the norm.
It seems too good to be true.
- Didn't the 0 offset bring the wheels out 45.5 mm further out (is the calculation I have been given)?
- is there enough clearance, in the wheel arches without a lift?
- And from the side sliding door?
- Did you not need to install wheel flares?
- What about additional stabilisers?
Really enjoying the Delica and looking forward to creating a purpose built van.
Welcome any advice or guidance.
Derek
Sydney, Australia
Attachments
DocWong
Active Member
Aplus:
“It seems too good to be true.
Yes, there is enough clearance to not need a lift and the sliding door is not integrated with.
No additional stabilizers needed. Delia handled better with this setup.
“I am setting up my car for trips to the "Snowy Mts" ski areas and trout fishing streams. I have already done two trips to the mountains driving 800 mile round trips each time. I found the Delica wheelbase very narrow and the high centre of gravity made for very unsettling driving coming down the mountain roads.”
Handling is SO much better with my setup. I drive the mountainous roads daily and find that Delica handles quite well for its platform. I catch up to most drivers in the mountains. ;-)
“It seems too good to be true.
- Didn't the 0 offset bring the wheels out 45.5 mm further out (is the calculation I have been given)?
- is there enough clearance, in the wheel arches without a lift?
- And from the side sliding door?
- Did you not need to install wheel flares?
- What about additional stabilisers?”
Yes, there is enough clearance to not need a lift and the sliding door is not integrated with.
No additional stabilizers needed. Delia handled better with this setup.
“I am setting up my car for trips to the "Snowy Mts" ski areas and trout fishing streams. I have already done two trips to the mountains driving 800 mile round trips each time. I found the Delica wheelbase very narrow and the high centre of gravity made for very unsettling driving coming down the mountain roads.”
Handling is SO much better with my setup. I drive the mountainous roads daily and find that Delica handles quite well for its platform. I catch up to most drivers in the mountains. ;-)
Aplus
New Member
Thank you DocWong. Great news. Can I confirm that the ROTA wheel you put on had a 0 offset.
Also what did you do about a spare, did you keep the old 15" wheel and tyre. Or did you modify the spare wheel bracket for a 265/80R16?
Yes Shelby. Well they are called the Snowy Mountains but right now they are suffering from a lack of snow! Maximum Height is Mt Kosciuszko which is only 2,228 m (7,310 ft).
DocWong
Active Member
Yes:
Wheels: Rota Grid Off-road: 16” #1680
Bolt Pattern: 6 x 139
Center ring: 110mm
0 offset
Tire: 265/70 R16 30.6”
As for the spare, I decided to keep the original spare mounted in a standard position underneath. My reasoning is if I ever got a flat I would put the spare upfront and disengage the hubs and be able to drive to a location where I can fix a flat or buy a new tire.
The disadvantage of course if you’re off road, I would be at a pretty big disadvantage. But I’m willing to take that chance in exchange for the convenience of having the stock spare underneath.
ScottyDiver
New Member
Doc, a very impressive list of upgrades and a beautiful machine. I hope I can get mine looking as good as yours. I have tones of questions, but will just start with a couple so I don’t overwhelm you:
- You found a guy that rebuilds or makes new Inclinometer. Please let us know his info, I want to replace mine as well
- What make model tires are those?
- A link to the main large light in the ceiling that you replaced with an LED?
- The source for the tow hitch?
- “Stock battery boxes….” Did yours come with two batteries?
DocWong
Active Member
Inclinometer: https://starwagon.info/shop/interior-components/l400-replacement-inclinometer/
Tires are Cooper 265/70 R16s
Regarding my interior lights, i just replaces sone of the incandescent bulbs with 4000 k led bulbs. I still have the original big fluorescent tubes as I like the reddish lights.
Tow hitch i got from someone on this board.
My battery box came stock with 2 batteries.
Tires are Cooper 265/70 R16s
Regarding my interior lights, i just replaces sone of the incandescent bulbs with 4000 k led bulbs. I still have the original big fluorescent tubes as I like the reddish lights.
Tow hitch i got from someone on this board.
My battery box came stock with 2 batteries.
Last edited:
Champzilla
New Member
Hi Doc - any write up or instructions on taking apart the instrument cluster to install the new face plate mod?
DocWong
Active Member
Hmmmm, as I recall, it was all pretty straight forward. The only tricky part was figuring out how the instrument cluster came out in the beginning. It turned out to simply pop out.
Just take your time. Please document for others though. I really loved this mod.
Also check all the bulbs, I replaced my burnt ones which was why my 4wd indicator lights were not indicating properly.
Just take your time. Please document for others though. I really loved this mod.
Also check all the bulbs, I replaced my burnt ones which was why my 4wd indicator lights were not indicating properly.
I happened across this the other day:Hi Doc - any write up or instructions on taking apart the instrument cluster to install the new face plate mod?
Champzilla
New Member
Thx Doc - I'm in and have everything all setup - looks great during a demo on the demo workbench. The only thing I can't seem to determine is where to run the flat/thin power cables? Do you recall if you reinstalled the cluster housing over the top of them or did you dremel out a hole in the back of the cluster housing?
@NearOrbit - yeah, saw that video...it helped. The sketchy part was getting off each needle to put the new gauge faceplate on.
@NearOrbit - yeah, saw that video...it helped. The sketchy part was getting off each needle to put the new gauge faceplate on.
Champzilla
New Member
One more string thought...where did you find power for the light? Assuming you soldered to something?
Champzilla
New Member
Thank you Doc. Unfortunately, I was overzealous and already removed the needles. Hopefully I can get them back on easily. Thanks for the tip on the power - i'll dig around.
Aplus
New Member
Hi DocWong,
Thought I should give you and other Delica Forum members the wrap up for my wheel and tyre upgrade.
Bought and had the Rota wheels shipped from Perth to Sydney (2,500 miles) and the Coopers Rugged Trek tyres delivered from Brisbane (500 miles): ROTA 5-Star wheels 16" x 8" with bolt pattern 6x139.5 (5.5”) and Cooper Rugged Trek DISCOVERER Tyres 265/70R16 and 0 offset.
Went around to the dealer to have the new wheels and tyres fitted last week and --- they don't fit!
Although the wheel is advertised as 110 mm CB, it is really only 105 mm. The reduced bore hole at the outside of the wheel enables the hub cap to be attached. The rear wheels fitted fine (just) but the front wheels would not go on because the extended wheel hub would not go through the 105 mm CB.
The dealer offered to have the additional 5mm ground out to make the wheels fit. I said that was acceptable as long as the Rota would accept liability for any damage to the wheels as that brought he hub very close to the wheel nuts and it looked like the wheel could fracture at that point given I am doing all this for 4WD. Rota refused to accept that responsibility and cancelled the sale, refunded the money and had the wheels returned (at their expense).
I think that was the right decision. But I now have the Coppers tyres and I am back looking for a replacement wheel for the existing stock Mitsubishi alloy wheels running 225 R15 that came with the car.
Anyone have a suggestion?